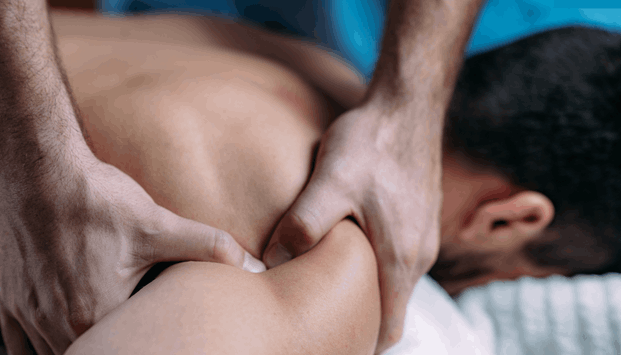
How Massage Therapy Can Improve Sleep Quality: An Evidence-Based Guide
Sleep is a cornerstone of physical and mental well-being. Yet, for millions of people worldwide, poor sleep quality remains a nightly battle. From insomnia to chronic sleep disturbances, insufficient or disrupted rest can have profound consequences on health. Fortunately, one increasingly recognized intervention is using massage therapy to improve sleep quality.
Emerging research suggests that the benefits of massage therapy extend beyond pain relief and stress reduction—it can also help improve sleep. Whether you’re experiencing insomnia, climacteric symptoms in postmenopausal women, or simply want to get a better night’s sleep, massage therapy can significantly improve your quality of sleep.
Why Quality Sleep Is Vital
Adults typically require seven to nine hours of sleep per night to support immune function, memory consolidation, hormone balance, and emotional regulation. Sleep deprivation is linked to increased risks of cardiovascular disease, obesity, depression, and cognitive decline. While many turn to medications or sleep aids, these can carry side effects or fail to address the root causes of poor sleep.
The Relationship Between Massage Therapy and Sleep
Massage therapy is the structured manipulation of soft tissue to promote relaxation, circulation, and recovery. Studies have increasingly shown that the effectiveness of massage therapy includes its ability to improve sleep quality, regulate the sleep-wake cycle, and promote a state conducive to sleep.
According to the American Massage Therapy Association (AMTA), massage therapy stimulates the production of serotonin and dopamine—neurotransmitters that play essential roles in mood regulation and the hormone responsible for regulating sleep, melatonin. By boosting these chemicals naturally, massage helps initiate the transition into deep sleep.
How Massage Therapy Enhances Sleep
Reduces Stress Hormones Massage therapy has been shown to decrease cortisol levels. Lower cortisol correlates with lower anxiety, improved mood, and better sleep.
Improves Parasympathetic Activation Massage shifts the body into a parasympathetic (rest-and-digest) state, reducing heart rate and blood pressure and promoting relaxation and sleep.
Alleviates Pain and Muscle Tension Chronic pain is a common barrier to sleep. The beneficial effects of massage therapy include reducing tension and inflammation, which helps individuals fall asleep more easily.
Regulates Circadian Rhythms By enhancing melatonin production, massage therapy may assist in realigning disordered sleep patterns.
Scientific Evidence Supporting Massage for Sleep
Numerous studies illustrate the impact on sleep quality following massage therapy sessions:
A study on postmenopausal women with insomnia found that massage therapy can help reduce insomnia and climacteric symptoms, improving both sleep and mood.
Research on institutionalized elderly populations showed that back massage and acupressure in improving the quality of sleep helped reduce sleep disturbances and enhanced the quality of sleep of institutionalized residents.
The curative effect of TCM massage (Traditional Chinese Medicine) has also been explored, showing that massage therapy is effective in reducing sleep disorder symptoms.
In a randomized controlled trial, therapeutic massage on insomnia significantly improved sleep quality and overall well-being in adults with chronic sleep disorders.
These findings collectively highlight that massage therapy can improve the duration and quality of sleep.
What Type of Massage Is Best for Sleep?
The type of massage plays a role in how effective it is for improving sleep:
Swedish Massage: Known for long, flowing strokes, Swedish massage promotes relaxation, lowers stress, and is often recommended by the American Massage Therapy Association for improving sleep quality.
Deep Tissue Massage: This type of massage targets deeper muscle layers and is effective for those with chronic tension or pain disrupting their quality sleep.
Therapeutic Massage: Often customized, this approach combines various massage techniques to meet individual needs and address both physiological and psychological aspects of poor sleep quality.
Ultimately, the right massage therapist will consider your specific symptoms and goals when choosing which type of massage may be most effective.
Frequency and Duration of Massage Therapy
Consistent massage sessions are key to seeing lasting benefits. While even a single massage therapy session can induce relaxation and improve that night’s sleep, regular appointments can help improve sleep quality over time. Most studies report benefits from weekly or bi-weekly sessions over 4–8 weeks.
Massage Therapy for Specific Sleep Challenges
Insomnia
Massage therapy has been shown to decrease sleep onset latency (time it takes to fall asleep) and increase total sleep time. Particularly for those with chronic insomnia, combining massage therapy with sleep hygiene practices (e.g., regular bedtime, avoiding screens, and caffeine) can produce significant improvements.
Climacteric Symptoms in Postmenopausal Women
Hot flashes, anxiety, and hormonal changes can disrupt sleep. Studies on the effect of massage in postmenopausal women suggest that massage therapy can significantly improve both climacteric symptoms and insomnia, leading to deeper, more restful sleep.
Stress-Related Sleep Disturbances
Stress is one of the most common barriers to quality sleep. By activating the parasympathetic nervous system and reducing mental chatter, massage therapy creates a calming environment that helps you get a better night’s rest.
Choosing a Registered Massage Therapist
To maximize the benefits of massage therapy, seek out a registered massage therapist (RMT) trained in therapeutic massage for sleep-related concerns. A skilled RMT will:
Understand the effect of therapeutic massage on the nervous system.
Customize massage techniques for your individual needs.
Provide guidance on how massage may complement other interventions like exercise or mindfulness.
Integrating Massage into a Sleep Hygiene Routine
While massage therapy is powerful, it works best when part of a comprehensive sleep hygiene routine:
Maintain a regular sleep schedule.
Create a cool, dark, quiet sleep environment.
Limit caffeine and screen time before bed.
Include regular physical activity.
Consider massage therapy sessions in the evening to help prepare for sleep.
Conclusion: Massage Therapy Is a Great Tool for Better Sleep
From easing insomnia and climacteric symptoms to helping regulate the sleep-wake cycle, massage therapy is a great natural solution for those seeking better sleep and overall well-being. The effect of massage therapy is not only physical but deeply emotional and neurological, touching every aspect of what it means to feel rested.
Whether you’re struggling with insufficient sleep, chronic sleep disturbances, or just want to enhance your sleep, incorporating massage therapy into your wellness routine can be a game-changer.
Research indicates that massage therapy is not just a luxury—it’s an effective, evidence-based method to help improve your sleep quality and quality of life in patients with sleep challenges.
If you’re looking to finally get a better night’s sleep, consult a registered massage therapist and discover how the benefits of massage therapy can transform your nights—and your days.
Injuries are an inevitable part of life, whether you’re an elite athlete, weekend warrior, or simply navigating daily activities. While injury can feel like a setback, it is often a gateway to improved health and performance when managed with the right approach. At the heart of both prevention and recovery is exercise—a tool that plays a crucial role in maintaining physical performance, reducing the risk of injury, and promoting overall well-being.
Understanding the Relationship Between Exercise and Injury
Exercise therapy is not only about building strength or recovering from an injury—it’s about moving better, living pain-free, and avoiding injuries in the future. A growing body of systematic reviews and clinical evidence shows that regular exercise—especially when tailored to the individual—reduces the likelihood of both initial injuries and their recurrence.
This is particularly true for musculoskeletal injuries, which affect the bones, muscles, ligaments, and joints. Conditions like sprains, strains, tendinopathies, and overuse injuries often arise when movement patterns are inefficient, muscle strength is lacking, or mobility and flexibility are compromised.
Exercise as a Cornerstone of Injury Prevention
Injury prevention hinges on proactively identifying and addressing deficits in strength and mobility, balance, and movement control. Strength training, in particular, is one of the most evidence-backed strategies to reduce the risk of injury across all age groups and activity levels. Studies show that strengthening exercises can reduce sports-related injuries by up to 50%.
A well-rounded exercise program should include:
Specific exercises targeting common weak points (e.g., hips, core, rotator cuff)
Balance exercises to enhance neuromuscular control
Stretching exercises and dynamic stretches to improve flexibility and range of motion
Gradually increasing training loads to build resilience and avoid overuse
Personalized exercise programs developed by a physiotherapist play a fundamental role in addressing these variables. Tailoring the exercise routine to individual needs, sport demands, and past injuries is essential for optimal recovery and injury prevention.
Recovering from an Injury: Rebuild and Restore
When an injury occurs, the immediate instinct might be to rest completely. While rest is appropriate during the acute stage of healing, staying active within safe parameters is often more beneficial. Exercise can help promote the delivery of nutrients and oxygen to the injured area, facilitating tissue regeneration and helping to reduce pain and swelling.
As the body transitions from the inflammatory to the repair phase, targeted exercises become critical to:
Help restore a full range of motion
Rebuild strength in and around the injured area
Prevent stiffness, muscle weakness, and related injuries
Improve joint stability and mobility
Neglecting exercise therapy during injury rehabilitation can lead to persistent deficits and a higher chance of injury recurrence.
The Role of Physiotherapy in Recovery Plans
A skilled physiotherapist designs and supervises safe and effective recovery plans that evolve with each stage of healing. These often involve:
Exercises designed to reduce pain
Exercises to improve tissue load tolerance
Gradual return-to-sport protocols
Monitoring for pain perception and compensation patterns
Emphasis on core strength, posture, and movement patterns
Tools like resistance bands, body weight exercises, and proprioceptive drills are used to progressively challenge the healing tissues without risking re-injury.
Preventing Re-injury: A Long-Term Strategy
One of the most overlooked aspects of injury recovery is the prevention of re-injury. Once the pain subsides, many individuals return to full activity prematurely, often skipping the crucial steps of retraining full range of motion, muscle endurance, and sport-specific demands.
Follow a treatment plan through to completion
Incorporate regular stretching and strength training into daily or weekly routines
Understand that activity can lead to adaptation, but too much, too soon, can lead to overuse
Build from the baseline activity level gradually
Accept that minor setbacks are part of the process, not failures
Building Resilience Through Consistency
Whether you’re recovering from an injury or simply trying to stay active, exercise programs that include strength, flexibility, and coordination drills are not optional—they are vital. They not only help prevent injuries, but also foster a deeper connection with your body’s needs and capabilities.
Regularly incorporating exercise into your life helps:
Improve core stability
Enhance physical performance
Regulate stress through the release of endorphins
Support health and wellness
Improve posture and gait mechanics
Allow for smoother performance of daily activities
Final Thoughts: The Importance of Exercise in Injury Care
In summary, exercise plays a vital role in every phase of injury care—from prevention to injury rehabilitation to long-term maintenance. It helps build strength, restore mobility and flexibility, and ensures that the recovery process is active and empowering.
At South Island Physiotherapy, we view injury not as a roadblock, but as an invitation to recalibrate your body and move better than before. Through personalized exercise and expert guidance, you can not only recover—but thrive.
If you’re dealing with an injury, or simply want to reduce your injury risk, consult with a physiotherapist today. Together, we can create an exercise routine that aligns with your goals and keeps you doing what you love—stronger and safer than ever.
Understanding Sciatica: What It Is, Why It Hurts, and How We Heal
Sciatica, also known as lumbar radiculopathy, occurs when a nerve root in the lower back becomes irritated or compressed. This typically affects the sciatic nerve, the largest nerve in the body, which travels from the lumbar spine through the hips and down each leg.
Sciatica pain often feels like sharp, burning, or electric sensations. It usually affects only one side and may be accompanied by numbness, tingling, or muscle weakness. It can be alarming, but the good news is that most people recover without surgery, and physical therapy is highly effective for pain relief.
What Causes Sciatica?
Common causes include:
Herniated disk – when the soft center of a spinal disk presses on a nerve root
Bone spurs – excess bone growth that compresses spinal nerves
Spinal stenosis – narrowing of the spinal canal
In rare cases: infection, tumor, or trauma affecting the spinal cord, bladder, or bowel
Most cases are due to a herniated disk, but it’s important to remember that the spine is resilient. Disks are adaptable structures that respond to stress. Like muscles, they grow stronger and healthier when used properly.
Symptoms of Sciatica
Sciatica may present with:
Low back pain that radiates into the buttocks and leg
Numbness or tingling down one leg
Muscle weakness in the foot or leg
Difficulty walking or standing
Rarely, bladder or bowel changes (seek urgent care if present)
Diagnosing Sciatica and Identifying Risk Factors
Diagnosis typically involves a thorough physical examination and medical history. Imaging (MRI or CT scan) may be used to identify a herniated disk or bone spur.
Risk factors for sciatica include:
Sedentary lifestyle
Poor physical load management
Obesity
Chronic stress
Poor dietary habits
Poor sleep quality
Comparing Treatment Options: Physical Therapy vs. Surgery
Many assume they need surgery for severe pain caused by sciatica, but most recover without surgery.
A 2020 BMJ review found that early surgery may speed up short-term recovery, but long-term outcomes were similar to those who had physical therapy only. In most cases, conservative care is effective.
Do You Really Need Core Exercises?
Contrary to popular belief, core strengthening is not required to recover from sciatica. Research shows that sciatic pain can improve without targeted core work. That said, light core engagement early on can help reintroduce safe motion and reduce fear of movement. But let’s be clear: core exercises are optional, not essential.
The McKenzie Method: A Smart First Step
The McKenzie protocol is a widely-used approach in physical therapy that helps identify movements that reduce nerve pain and centralize symptoms. It’s particularly effective in the early phase of recovery, especially when symptoms are aggravated by spinal flexion.
Recovery in 3 Stages:
Stage 1: Reintroduce Movement
McKenzie-based movements
Walking and light stretching
Reduce sensitivity of the nerve root
Stage 2: Load the Spine
Progressive loading with squats, deadlifts, and full-body strength work
Focus on tissue adaptation, not pain elimination
Stage 3: Reintegrate Function
Return to hobbies, sports, work, and play
Exposure to real-world loading and impact
Debunking the Myth of Fragile Disks
A common belief is that people with sciatica should avoid impact and lifting. This is outdated and incorrect. Humans are not machines that wear out — we are ecosystems that adapt to stress.
When disks are exposed to appropriate stress, they get thicker, stronger, and more resilient. Long-term avoidance of load often leads to deconditioning, increased pain sensitivity, and reduced quality of life.
Supporting Recovery Through Lifestyle
Successful recovery isn’t just about the right exercises. It also depends on:
Sleep quality – deep sleep helps tissue healing
Dietary practices – anti-inflammatory foods aid recovery
Stress management – emotional and psychological states affect nerve pain
Physical load management – balancing rest with movement
Your nervous system responds to your entire environment — not just your physical symptoms.
Frequently Asked Questions
What’s the difference between sciatica and low back pain?
Low back pain is often localized, while sciatic pain radiates from the lower back into the leg.
How long does it take to recover from sciatica?
Most people feel significant relief within 6–12 weeks. Recovery varies, but many get better without surgery.
Do I need imaging to confirm sciatica?
Not always. A skilled clinician can often diagnose lumbar radiculopathy through a physical examination.
Can I exercise with sciatica?
Yes. Movement is key. With guidance, exercise helps reduce pain and improve function.
Is surgery my only option for severe sciatic pain?
No. Many patients avoid surgery and still get long-term pain relief through physical therapy and lifestyle changes.
Why is my pain worse on some days and not on others?
This is common with nerve irritation. Flare-ups are normal. The goal is to build long-term resilience.
Getting Back to Pain-Free Movement
Sciatica can feel scary, but it doesn’t mean your spine is damaged. With movement, support, and the right treatment, you can recover fully — often without surgery. Remember: your body is designed to heal. You are not broken.
Our Therapists at South Island Physiotherapy understand that through structured movement like the McKenzie protocol, progressive loading with exercises like squats and deadlifts, and holistic care including sleep, stress, and dietary support, recovery is not only possible — it’s expected. If you’re ready to move confidently again, book a consultation with our team at South Island Physio today and take the first step toward lasting relief from sciatic pain.
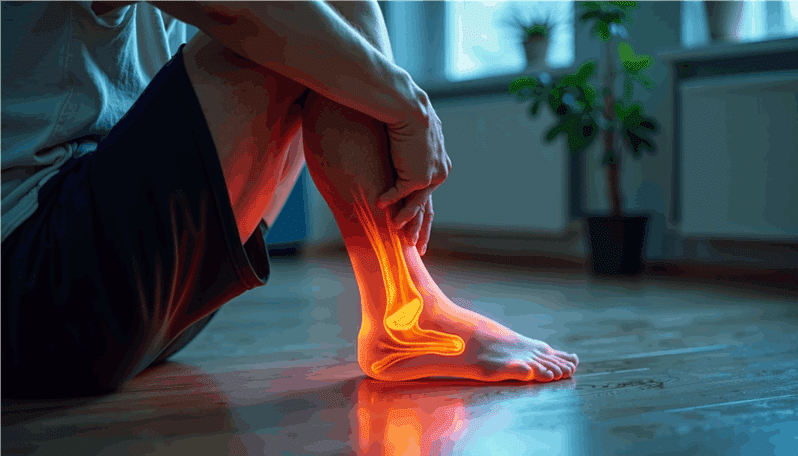
Lasting Relief from Achilles Tendinitis Through Expert, Research-Backed Care
At South Island Physiotherapy in Victoria, BC, we believe injuries are opportunities—not setbacks. One of the most common tendon injuries we help patients recover from is Achilles tendinitis. Whether you’re dealing with a new injury or persistent Achilles tendon pain, this guide covers the current evidence-based treatments for both acute and chronic stages of recovery.
What Is the Achilles Tendon?
The Achilles tendon is the largest and strongest tendon in the body. It connects your calf muscle to your heel bone and plays a key role in walking, running, and jumping. This lower leg tendon absorbs large amounts of force—especially during sports or high-impact activities.
When this tendon becomes irritated or damaged, you may experience pain, swelling, or stiffness near the heel. These symptoms are typically grouped under the broader term Achilles tendinopathy.
Types of Achilles Tendon Injuries
Achilles Tendinitis (Tendonitis)
Achilles tendinitis, sometimes spelled tendonitis, is an early-stage injury marked by inflammation in the Achilles tendon. It often results from overuse, sudden changes in activity, or poor biomechanics in the foot and ankle.
Achilles Tendinosis
When tendon pain becomes chronic and the inflammation subsides, the tendon itself may begin to break down. This condition is called Achilles tendinosis and is associated with thickening, reduced blood flow, and changes to the tendon’s structure.
Achilles Tendinopathy
This general term refers to any pain or dysfunction in the Achilles tendon, including both tendinitis and tendinosis. It’s the term most used in current sports medicine research and clinical guidelines.
Insertional Achilles Tendinopathy
This form of Achilles tendinopathy occurs when the Achilles tendon attaches to the heel bone. Known as insertional Achilles, it may involve bony spurs and often feels worse when walking uphill or wearing unsupportive shoes.
Achilles Tendon Rupture
In severe cases, the Achilles tendon can partially or completely tear—a condition called Achilles tendon rupture. This often occurs during explosive movements and may require a walking boot or surgical repair, followed by physical therapy.
Diagnosing Achilles Tendonitis and Tendinopathy
Diagnosis begins with a physical exam. Your physiotherapist will assess the range of motion, strength, and tenderness in the lower leg, heel, and ankle.
When needed, imaging such as magnetic resonance imaging (MRI) or ultrasound can confirm the extent of the damage or rule out a tendon rupture. However, most cases can be diagnosed and treated based on symptoms and function.
During the acute phase of Achilles tendinitis, the focus is on reducing inflammation, managing pain, and preventing further damage.
Activity Modification
Avoid aggravating movements like running or jumping. Replace them with low-impact activities such as swimming or cycling to stay active without straining the Achilles tendon.
Ice and Elevation
Apply ice to the painful area for 15–20 minutes several times a day. Elevating your lower leg can also help reduce inflammation.
Footwear and Orthotics
Supportive footwear with proper cushioning can take pressure off the heel and tendon. A heel lift or custom orthotic can provide short-term relief, especially for insertional Achilles issues.
Walking Boot (When Needed)
In more serious cases, especially where pain limits walking, a short-term walking boot may be used to offload the tendon and allow healing to begin.
If symptoms persist for more than six weeks, they’re considered chronic, and treatment shifts from rest to active rehabilitation. At South Island Physiotherapy, our team uses targeted physical therapy techniques backed by strong research.
Eccentric Strengthening Exercises
The gold standard for Achilles tendinopathy treatment is eccentric loading—slowly lowering the heel off of a step under body weight. This exercise strengthens the calf muscle and encourages tendon remodelling.
Examples include:
Straight-leg heel drops (for the gastrocnemius)
Bent-knee heel drops (for the soleus)
A typical program runs for 12 weeks and gradually increases in intensity.
Stretching
Tight calf muscles can put excess strain on the Achilles tendon. Gentle daily stretching of the calf and ankle helps improve flexibility and reduce tension on the tendon.
Manual Therapy
Hands-on treatment by your physiotherapist can improve joint mobility in the ankle and soft tissue quality around the tendon and heel.
Gradual Return to Sport
Your therapist will help you build a step-by-step plan to return to running or sport safely, using low-impact activities first and progressing based on tendon tolerance.
Advanced and Adjunctive Treatments
Shockwave Therapy
Some research supports extracorporeal shockwave therapy (ESWT) for chronic Achilles tendinopathy. It may improve pain when used alongside exercise therapy.
Injections and Surgery
Corticosteroid injections are not commonly used due to the risk of tendon rupture. In rare, stubborn cases where conservative care fails, surgical treatment may be considered.
Preventing Achilles Tendon Injuries
Even after recovery, it’s important to protect your Achilles tendon and avoid re-injury. Here’s what you can do:
Warm up before activity and cool down after
Progress training loads slowly—no more than 10% increase per week
Regularly strengthen your calf muscles
Stretch daily to maintain range of motion
Use proper shoes and orthotics if advised
Include low-impact activities like biking or swimming in your routine
When to Seek Help
If you’re experiencing persistent heel or ankle pain, don’t wait. The sooner Achilles tendinitis or tendinopathy is treated, the better the outcome. At South Island Physiotherapy, we provide tailored physical therapy programs rooted in sports medicine principles and designed to help you move freely and confidently again.
Ready to Start Healing?
Achilles tendon pain can slow you down—but with the right support, it doesn’t have to stop you. Whether you’re managing acute tendonitis or chronic Achilles tendinopathy, our team is here to help you recover through education, strengthening exercises, and movement-focused care.
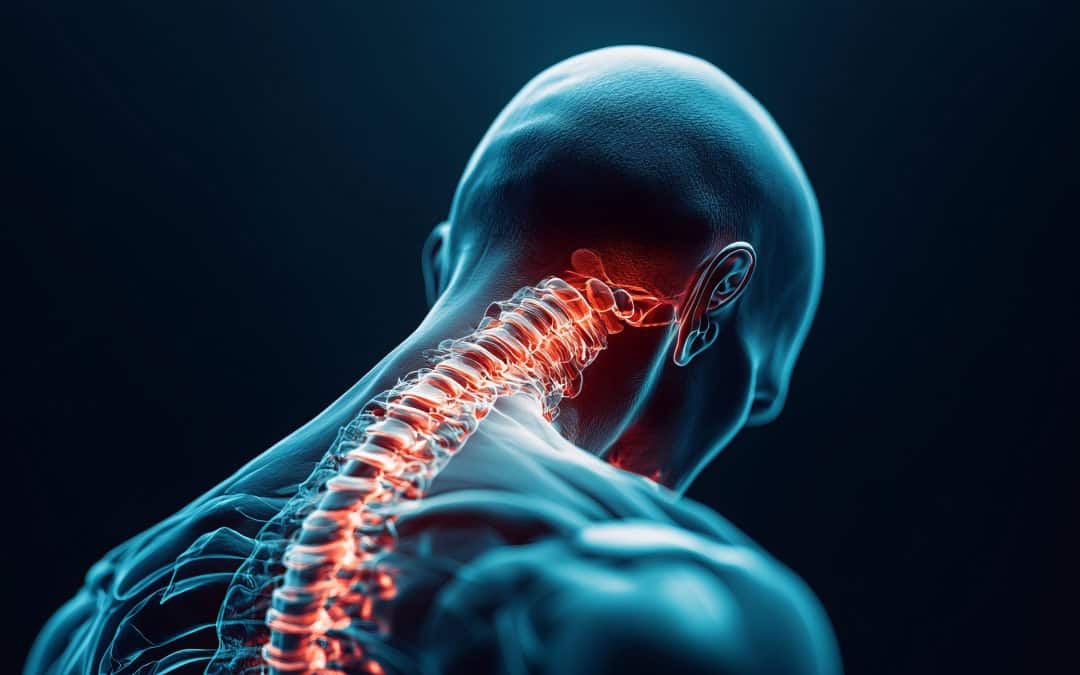
Cervical Radiculopathy – “Pinched Nerve” Management in Primary Care
Cervical radiculopathy, often called a “pinched nerve in the neck,” happens when a nerve root in the cervical spine (neck) gets compressed or irritated. This can cause pain, tingling, numbness, and muscle weakness that spreads from the neck to the shoulders, arms, and hands. While severe cases may require surgical treatment, most people can find relief with conservative (nonsurgical) treatment options.
This article explores the common causes, symptoms, diagnosis, and conservative treatment options for cervical radiculopathy.
What Causes Cervical Radiculopathy?
Cervical radiculopathy is often caused by conditions that put pressure on the nerve root.
Common causes include:
Cervical disc disease: Age or trauma-related changes in the discs between the cervical vertebrae can lead to bulging or herniated discs, which press on the spinal nerve root.
Cervical spondylosis: Age-related degenerative cervical changes can lead to bone spurs that put pressure on the nerves.
Injury or trauma: Accidents or sudden movements can damage the cervical spine and cause nerve compression.
Spinal stenosis: Narrowing of the spinal canal can put pressure on the nerve roots.
Symptoms of Cervical Radiculopathy
Patients with cervical radiculopathy may experience:
Neck and upper extremity pain: Pain that radiates from the neck to the shoulders, arms, and hands.
Tingling or numbness: Affected nerve roots may cause a “pins and needles” sensation in the arms or hands.
Muscle weakness: Some people notice difficulty gripping objects or lifting their arms.
Radicular symptoms: Symptoms that follow the path of the affected nerve, including pain, burning, or electric shock sensations.
Neurological symptoms: Loss of reflexes and coordination in the arms and hands.
It’s important to distinguish between cervical radiculopathy and cervical myelopathy. While radiculopathy affects the nerve roots, cervical myelopathy involves spinal cord compression, which can lead to more severe symptoms, including balance and coordination problems.
Diagnosing Cervical Radiculopathy
A Physiotherapist, Chiropractor or Medical Doctor will diagnose cervical radiculopathy based on a patient’s symptoms, medical history, and physical examination. Some tests that may be used to confirm a cervical radiculopathy diagnosis include:
Magnetic resonance imaging (MRI): This is the most effective imaging test for detecting nerve compression, herniated discs, and other spinal issues.
X-rays: Can show degenerative cervical changes, such as bone spurs or disc narrowing.
Electromyography (EMG): Assesses nerve function and helps distinguish between nerve and muscle problems.
Conservative Treatment Options
Most cases of cervical radiculopathy improve with nonsurgical treatment. A primary care doctor or physical therapist may develop a treatment plan that includes:
1. Physical Therapy
Physical therapy is one of the most effective conservative treatments for cervical radiculopathy. A physical therapist can teach exercises to relieve pain, improve mobility, and strengthen muscles that support the neck and upper back. Key techniques include:
Deep cervical flexor exercises: Strengthening these muscles can help relieve symptoms and reduce pressure on the nerve.
Cervical traction: A method that gently stretches the neck to relieve pressure on the nerve root.
Postural correction: Improving posture can reduce strain on the cervical spine and help treat cervical radiculopathy.
2. Medications
Over-the-counter and prescription medications may help relieve pain and inflammation. Common options include:
Nonsteroidal anti-inflammatory drugs (NSAIDs): Such as ibuprofen or naproxen, to reduce pain and inflammation.
Muscle relaxants: Can help with muscle tightness and spasms.
Oral corticosteroids: Sometimes, a doctor may prescribe steroids to reduce swelling around the affected nerve.
3. Use of a Soft Cervical Collar
A soft cervical collar can temporarily support the neck and reduce movement that may worsen symptoms. However, it is generally recommended only for short-term use, as prolonged use can weaken neck muscles.
4. Cervical Pillow and Nighttime Support
A cervical pillow can help maintain proper neck alignment while sleeping, reducing pressure on the affected nerve.
5. Lifestyle Modifications
Ergonomic adjustments: Using a supportive chair, keeping screens at eye level, and maintaining good posture can help prevent worsening symptoms.
Activity modification: Avoiding repetitive neck movements or heavy lifting can reduce pressure on the cervical nerve.
6. Epidural Steroid Injections
For severe pain that does not improve with other treatments, a doctor may recommend an epidural steroid injection to reduce inflammation and relieve pain.
When Surgery May Be Recommended
While most patients with cervical radiculopathy get better with conservative treatment, some cases may require surgical treatment if symptoms persist for several months or worsen. Surgical options include:
Anterior cervical decompression and fusion (ACDF): A procedure where the affected disc is removed and the vertebrae are fused to stabilize the spine.
Artificial disc replacement: Instead of fusing the spine, an artificial disc is inserted to preserve motion.
A doctor may recommend surgery if a patient has severe nerve root pain, progressive muscle weakness, or signs of spinal cord compression.
Cervical radiculopathy is a common cause of neck and arm pain when a nerve in the neck is compressed. Fortunately, most cases improve with conservative treatment, including physical therapy, medications, cervical traction, and lifestyle adjustments. While surgical treatment may be necessary for some patients, nonsurgical options can effectively reduce pain, improve function, and help individuals return to daily activities.
If you are experiencing symptoms like neck and arm pain, muscle weakness, or numbness, our expert team at South Island Physiotherapy in Victoria, BC, can help! Contact us for a proper diagnosis and treatment plan. With the right approach, most patients can successfully relieve symptoms and avoid surgery.