The postpartum period is a transformative time filled with both joy and challenges. During and after pregnancy and delivery, your body undergoes a significant healing process, and returning to physical activity can play a crucial role in your recovery.
However, it’s important for new moms to approach postpartum exercises with care, as your body has undergone tremendous changes, particularly if you’ve experienced a vaginal delivery or cesarean delivery. This guide explores the 10 best evidence-based exercises to safely and effectively help you regain postnatal fitness, improve your mental well-being, and support your overall health during the initial phase of recovery.
Understanding Postpartum Fitness
Before diving into specific exercises, it’s important to understand what postpartum fitness entails. The postpartum period, also known as the fourth trimester, typically spans the first six weeks after childbirth, although full recovery can take several months or longer. During this time, your body is healing from the physical demands of pregnancy and childbirth, whether through vaginal delivery or cesarean section.
One of the key areas to focus on in postpartum fitness is the pelvic floor. The pelvic floor muscles are often weakened or stretched during pregnancy and childbirth, leading to potential issues such as incontinence or pelvic organ prolapse. Another common concern is diastasis recti, a separation of the abdominal muscles that can occur during pregnancy. Addressing these concerns with targeted exercises can promote a healthier recovery, help reduce these symptoms and improve your overall physical condition.
It’s also important to note that the American College of Obstetricians and Gynecologists (ACOG) recommends that women should aim to engage in physical activity as soon as they feel ready, but they should always listen to their bodies and consult with their healthcare provider before beginning any new exercise routine. Your exercise routine should be tailored to your individual needs and recovery progress.
With these considerations in mind, let’s explore the 10 best exercises for postpartum recovery.
1. Walking: The Perfect Starting Point
Why It’s Effective: Walking is one of the simplest and most accessible forms of exercise, making it an ideal starting point for postpartum fitness. As a low-impact activity, walking can be initiated almost immediately after childbirth, depending on your comfort level and any specific medical advice you’ve received. Walking helps to gently reintroduce movement, improve cardiovascular health, and boost mood, which is crucial during the postpartum period when women are at a higher risk for postpartum depression.
Evidence: Numerous studies have shown that walking can significantly improve postpartum recovery by reducing fatigue and improving overall mood. In particular, walking has been found to be effective in reducing the symptoms of postpartum depression, a condition that affects approximately 10-15% of new mothers.
How to Start: Begin with short, gentle walks around your home or neighbourhood. If you’re recovering from a vaginal delivery, you might feel ready to start walking sooner, while cesarean section recovery might require a bit more time before you feel comfortable walking longer distances. Gradually increase your walking distance and pace as your stamina improves. Listen to your body and avoid overexertion, especially in the early weeks of postpartum recovery.
2. Pelvic Floor Exercises (Kegels): Strengthening the Core
Why It’s Effective: The pelvic floor muscles play a critical role in supporting the bladder, uterus, and bowel. During pregnancy and childbirth, these muscles are often stretched and weakened, leading to potential issues such as urinary incontinence. Pelvic floor exercises, commonly known as Kegels, are essential for strengthening these muscles, preventing incontinence, and promoting overall core stability.
Evidence: The American College of Obstetricians and Gynecologists (ACOG) strongly recommends pelvic floor exercises as part of a comprehensive postpartum recovery plan. Research has demonstrated that consistent Kegel exercises can significantly improve pelvic floor muscle strength and function, reducing the likelihood of incontinence and other pelvic floor disorders.
How to Perform: To perform a Kegel exercise, contract your pelvic floor muscles as if you’re trying to stop the flow of urine. Hold the contraction for a count of five, then relax for a count of five. Repeat this process 10-15 times, several times a day. It’s important to avoid holding your breath or tightening your abdominal or buttock muscles during the exercise. As your pelvic floor muscles strengthen, you can gradually increase the duration of the contractions.
3. Deep Breathing with Abdominal Contraction: Reconnecting with Your Core
Why It’s Effective: After giving birth, it’s important to reconnect with your core muscles, particularly if you’ve experienced diastasis recti. Deep breathing exercises that incorporate abdominal contractions are a gentle and effective way to begin strengthening your core without placing undue stress on your abdominal muscles.
Evidence: Research supports the use of deep breathing exercises as an effective way to re-engage the core muscles and promote recovery from diastasis recti. These exercises help to restore function to the transverse abdominis, the deepest layer of abdominal muscles, which plays a key role in core stability.
How to Perform: Lie on your back with your knees bent and feet flat on the floor. Place one hand on your abdomen. Take a deep breath in, allowing your abdomen to rise as your lungs fill with air. As you exhale, gently contract your abdominal muscles, pulling your belly button towards your spine. Hold the contraction for a few seconds before releasing and taking another deep breath. Repeat this process 10-15 times. This exercise can be done daily and can be incorporated into your routine as you progress through your postpartum recovery.
4. Glute Bridges: Building Lower Body Strength
Why It’s Effective: Glute bridges are an excellent postpartum exercise for strengthening the glutes, hamstrings, and lower back. This exercise also engages the pelvic floor muscles, making it a comprehensive movement that supports overall core stability. Strengthening the glutes and lower back is particularly important after childbirth, as these muscles play a key role in maintaining proper posture and reducing lower back pain.
Evidence: Glute bridges are a staple in many postpartum fitness routines due to their effectiveness in targeting multiple muscle groups without placing excessive strain on the body. Research has shown that glute bridges can improve lower body strength and stability, which is essential for daily activities and overall mobility.
How to Perform: Lie on your back with your knees bent and feet flat on the floor, hip-width apart. Engage your core and squeeze your glutes as you lift your hips towards the ceiling, creating a straight line from your shoulders to your knees. Hold the bridge position for a few seconds, then slowly lower your hips back to the floor. Repeat for 10-15 repetitions, focusing on maintaining proper form throughout the exercise. As you progress, you can increase the number of repetitions or add a resistance band around your thighs for added challenge.
5. Postnatal Yoga: A Holistic Approach to Recovery
Why It’s Effective: Postnatal yoga offers a gentle and holistic approach to postpartum recovery, combining physical movement with mental relaxation. Yoga helps improve flexibility, strengthen muscles, and promote relaxation, making it an ideal practice for new mothers. Additionally, the mindfulness aspect of yoga can be beneficial for managing stress and reducing the risk of postpartum depression.
Evidence: Several studies have highlighted the benefits of postnatal yoga for postpartum women. Research has shown that yoga can significantly reduce symptoms of postpartum depression and anxiety while also improving physical strength, flexibility, and overall well-being. The combination of gentle stretching, strengthening, and deep breathing exercises can support both physical and mental recovery.
How to Start: If possible, join a postnatal yoga class led by a certified instructor who is knowledgeable about the specific needs of postpartum women. Alternatively, you can follow a guided postnatal yoga routine online. Focus on gentle poses that emphasize breathing, relaxation, and slow, controlled movements. Avoid poses that place excessive strain on the abdominal muscles, especially if you have diastasis recti. Common postnatal yoga poses include child’s pose, cat-cow stretch, and seated forward bends.
6. Modified Planks: Rebuilding Core Strength
Why It’s Effective: Planks are a highly effective exercise for strengthening the core muscles, including the transverse abdominis, which is crucial for postpartum recovery. However, it’s important to modify this exercise to avoid placing too much pressure on the abdominal muscles, particularly if you’re dealing with diastasis recti.
Evidence: Modified planks are recommended in postpartum exercise routines because they allow you to rebuild core strength gradually and safely. Studies have shown that modified planks can help improve core stability and reduce the risk of exacerbating diastasis recti, making them a valuable addition to any postpartum workout plan.
How to Perform: Start on your hands and knees, with your wrists aligned under your shoulders and your knees aligned under your hips. Engage your core and slowly extend one leg behind you, keeping your back straight and your core engaged. Hold this position for 10-20 seconds, then switch to the other leg. As you build strength, you can progress to a full plank position, either on your hands or forearms, but continue to listen to your body and avoid any exercises that cause discomfort or pain.
7. Leg Slides: Gentle Core Activation
Why It’s Effective: Leg slides are a gentle exercise that helps re-engage the core muscles and strengthen the lower body without placing excessive pressure on the abdominal muscles. This exercise is particularly useful for new mothers who are recovering from diastasis recti or who are looking to gradually rebuild core strength.
Evidence: Leg slides are often included in postpartum workout routines due to their low-impact nature and their effectiveness in promoting core stability and strength. Research has shown that exercises like leg slides can help improve core muscle activation and contribute to overall postpartum recovery.
How to Perform: Lie on your back with your knees bent and feet flat on the floor. Engage your core by gently pulling your belly button towards your spine. Slowly slide one leg out straight, keeping your core engaged and your lower back in contact with the floor. Slide the leg back to the starting position and repeat with the other leg. Perform 10-15 repetitions on each side, focusing on maintaining proper form and controlled movements throughout the exercise.
8. Cat-Cow Stretch: Enhancing Spinal Mobility
Why It’s Effective: The cat-cow stretch is a gentle and effective way to improve flexibility in the spine, reduce lower back pain, and engage the core muscles. This exercise is particularly beneficial for new mothers who may be experiencing discomfort or stiffness in the back due to the physical demands of pregnancy and childbirth.
Evidence: The cat-cow stretch is a common component of postnatal exercise routines because of its ability to promote spinal mobility and reduce discomfort in the postpartum period. Research has shown that this exercise can help alleviate lower back pain and improve overall spinal mobility, making it an essential movement for postpartum recovery.
How to Perform: Start on your hands and knees, with your wrists aligned under your shoulders and your knees aligned under your hips. Inhale as you arch your back, lifting your head and tailbone towards the ceiling (cow position). Exhale as you round your spine, tucking your chin to your chest and drawing your belly button towards your spine (cat position). Repeat this sequence slowly and fluidly, focusing on your breathing and the movement of your spine. Perform 10-15 repetitions, or as needed, to relieve tension and improve spinal mobility.
9. Side-Lying Leg Lifts: Strengthening the Hips and Glutes
Why It’s Effective: Side-lying leg lifts are an excellent exercise for targeting the hip abductors and glutes, which play a crucial role in stabilizing the pelvis and supporting overall lower body strength. Strengthening these muscles is particularly important after childbirth, as they help to maintain proper alignment and reduce the risk of pelvic floor dysfunction.
Evidence: Research has shown that side-lying leg lifts can effectively improve hip strength and stability, which is essential for postpartum women who may be experiencing pelvic discomfort or instability. This exercise is also beneficial for improving overall lower body strength and function.
How to Perform: Lie on your side with your legs straight and stacked on top of each other. Rest your head on your bottom arm, and place your top hand on the floor in front of you for support. Engage your core and slowly lift your top leg upwards, keeping it straight and in line with your body. Hold the lift for a few seconds, then lower the leg back down with control. Repeat 10-15 times on each side, focusing on engaging the glutes and maintaining a stable core throughout the exercise.
10. Pelvic Tilts: Easing Lower Back Pain
Why It’s Effective: Pelvic tilts are a simple yet highly effective exercise for mobilizing the lower back and re-engaging abdominal muscles. This exercise is particularly beneficial for new mothers who are experiencing lower back pain or discomfort, as it helps to gently reintroduce movement to the lower back and core.
Evidence: Pelvic tilts are often recommended by physical therapists as part of a comprehensive postpartum recovery plan. Research has shown that pelvic tilts can help alleviate lower back pain, improve core stability, and support overall spinal health.
How to Perform: Lie on your back with your knees bent and feet flat on the floor. Place your hands on your lower abdomen. As you exhale, gently tilt your pelvis upward, flattening your lower back against the floor. Hold the tilt for a few seconds, then release and return to the starting position. Repeat this movement 10-15 times, focusing on controlled, gentle movements. This exercise can be performed daily to help alleviate lower back pain and promote overall spinal health.
Conclusion
Postpartum recovery is a gradual and individualized process that requires patience, self-compassion, and careful attention to your body’s needs. The exercises outlined in this guide are by no means exhaustive and are designed to help you safely and effectively re-engage with exercise, improve your mental health, and support your overall well-being during the postpartum period.
It’s important to remember that every woman’s postpartum journey is unique, and there is no one-size-fits-all approach to recovery. The American College of Obstetricians and Gynecologists (ACOG) emphasizes the importance of personalized care, so it’s crucial to listen to your body and consult with your pelvic floor specialist like the ones at South Island Physiotherapy before beginning or progressing any new exercise routine. This is especially important if you have specific concerns, such as diastasis recti, pelvic floor dysfunction, or complications from childbirth.
As you incorporate these exercises into your postpartum workout routine, remember to take it slow and allow your body the time it needs to heal and rebuild. By doing so, you’ll be taking important steps towards a healthy recovery and a stronger, more resilient body, setting the foundation for long-term health and well-being.
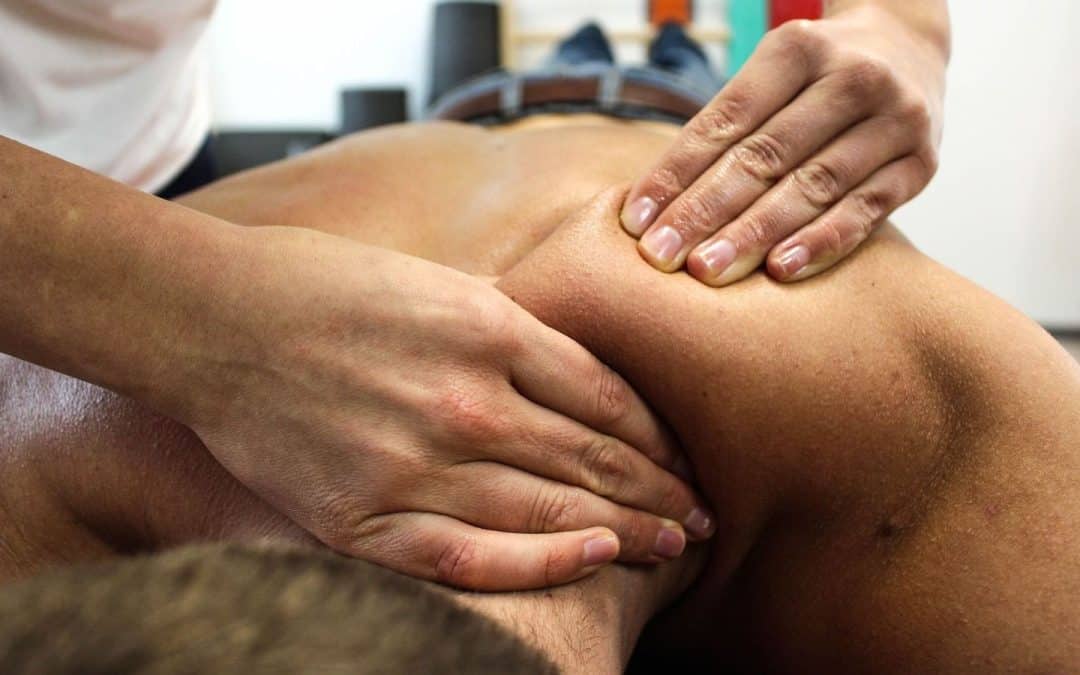
Effects, Mechanisms, and Supporting Evidence of Myofascial Release Therapy
Myofascial release therapy (MFR) is a type of manual therapy that focuses on relieving tension in the fascia, the connective tissue that surrounds and supports muscles and other structures throughout your body. This therapy may be beneficial for various conditions, particularly those involving muscle and joint pain. Let’s explore the principles of myofascial release therapy, its proposed physiological effects, and the evidence supporting its use.
What is Myofascial Release Therapy?
Myofascial release therapy involves the application of sustained pressure and gentle stretching to the myofascial tissue with the aim of releasing restrictions and tension. This hands-on technique is typically performed by physical therapists, registered massage therapists, and occupational therapists. During therapy sessions, the therapist will massage and stretch the fascia, targeting areas that feel stiff and tight, to improve the elasticity and mobility of the tissue.
Proposed Physiological Effects of Myofascial Release Therapy
1. Reduction of Fascial Restrictions
Theory: Fascia can become restricted due to trauma, inflammation, or poor posture, leading to decreased mobility and pain. Myofascial release therapy focuses on releasing these restrictions to restore normal function.
Evidence: Some studies have shown that MFR can increase tissue elasticity and reduce fascial stiffness, which may help improve range of motion and alleviate pain.
2. Pain Relief
Theory: By releasing fascial restrictions and improving blood flow, myofascial release therapy can reduce pain and discomfort associated with various musculoskeletal conditions.
Evidence: Some research indicates that MFR can be effective in reducing pain in conditions such as chronic low back pain, fibromyalgia, and plantar fasciitis.
3. Improved Circulation
Theory: MFR is thought to enhance blood flow to affected areas, promoting healing and reducing inflammation.
Evidence: Some studies suggest that MFR can improve microcirculation and lymphatic flow, aiding in the removal of metabolic waste products and reducing inflammation.
4. Enhanced Muscle Function
Theory: Releasing fascial tension can improve muscle function by allowing muscles to move more freely and efficiently.
Evidence: Evidence supports the idea that MFR can improve muscle activation and coordination, potentially enhancing athletic performance and reducing the risk of injury.
5. Stress Reduction
Theory: The gentle, sustained pressure of MFR can activate the parasympathetic nervous system, promoting relaxation and reducing stress.
Evidence: Preliminary research suggests that MFR may have beneficial effects on stress reduction and overall mental well-being.
Evidence Supporting Myofascial Release Therapy
While anecdotal reports and clinical experience have long supported the use of MFR, scientific research has begun to provide more rigorous evidence of its effectiveness. Here are some key findings:
Chronic Low Back Pain: A systematic review and meta-analysis found that MFR significantly reduces pain and improves functional outcomes in patients with chronic low back pain.
Fibromyalgia: Studies have shown that MFR can reduce pain, improve sleep quality, and enhance the quality of life in patients with fibromyalgia.
Plantar Fasciitis: Research indicates that MFR can be an effective treatment for reducing pain and improving function in individuals with plantar fasciitis.
Carpal Tunnel Syndrome: MFR may help reduce pain and improve hand function in patients with carpal tunnel syndrome.
How Myofascial Release Therapy Works
Assessment: The therapist assesses the patient’s posture, movement patterns, and areas of pain or restriction. This may involve identifying myofascial trigger points, which are stiff areas in the muscle that cause pain.
Application of Pressure: The therapist applies gentle, sustained pressure to specific areas of the fascia using their hands, elbows, or specialized tools like foam rollers.
Stretching and Movement: The therapist may incorporate gentle stretching and movement to help release fascial restrictions.
Monitoring Response: The therapist monitors the patient’s response to the treatment and adjusts the pressure and techniques as needed.
Self-Myofascial Release
Self-myofascial release involves using tools like foam rollers or roller massagers to apply pressure to the fascia. This can be done at home and is a convenient way to manage pain and maintain flexibility between therapy sessions. Self-myofascial release might involve rolling the foam roller over the muscles and holding pressure on tight spots for 30-60 seconds.
Conditions Treated by Myofascial Release
Myofascial release therapy can help with various conditions, including:
Myofascial Pain Syndrome: A chronic pain disorder caused by sensitivity and tightness in your myofascial tissues. Pain originates from specific trigger points and can be widespread.
Low Back Pain: MFR can help alleviate chronic low back pain by releasing tight fascia in the lumbar region.
Fibromyalgia: MFR may reduce widespread pain and improve quality of life for fibromyalgia patients.
Carpal Tunnel Syndrome: MFR can relieve pain and improve hand function by targeting the fascia in the wrists and hands.
Plantar Fasciitis: MFR can reduce pain in the feet by releasing tight fascia in the plantar area.
Benefits of Myofascial Release Therapy
Pain Relief: MFR can provide significant pain relief for various musculoskeletal conditions.
Improved Range of Motion: By releasing fascial restrictions, MFR can enhance flexibility and mobility.
Reduced Stress: The relaxation response elicited by MFR can help reduce overall stress levels.
Enhanced Muscle Function: Improved fascial mobility can lead to better muscle function and coordination.
Conclusion
The specific physiological changes that may occur during Myofascial release therapy remain a hot topic for debate however it maintains itself as a popular and promising modality for addressing a range of musculoskeletal conditions and improving overall physical function ( at least in the short term). Whether performed by a physical therapist or through self-myofascial release techniques, this type of therapy may benefit those experiencing pain and discomfort from various conditions. More research is needed to fully understand its mechanisms and long-term effects. While current evidence supports its use for pain relief, improved mobility, and enhanced muscle function, It also remains true that progressive loading of the injured region is the most predictable form of intervention to produce durable long-term changes in physiological tissue. As we often state in the clinic, the body is an ecosystem and responds well to active stressors. Passive stressors like MFR are a wonderful adjunct to active exercise in order to facilitate confidence and comfort while pursuing long term results.
If you’re considering myofascial release therapy, consult with a qualified healthcare professionals like the ones at South Island Physiotherapy to determine if it’s appropriate for your specific needs and conditions. By incorporating myofascial release into your wellness routine, you may experience significant improvements in your physical health and overall well-being.
References
Ajimsha, M. S., Al-Mudahka, N. R., & Al-Madzhar, J. A. (2015). Effectiveness of myofascial release: Systematic review of randomized controlled trials. Journal of Bodywork and Movement Therapies, 19(1), 102-112.
Kim, J. H., Kim, S. H., & Kim, Y. H. (2014). The effect of myofascial release on pain and functional outcomes in patients with chronic low back pain: A meta-analysis. Journal of Physical Therapy Science, 26(1), 177-179.
Castro-Sánchez, A. M., Matarán-Peñarrocha, G. A., Arroyo-Morales, M., et al. (2011). Effects of myofascial release techniques on pain and sleep quality in patients with fibromyalgia: A randomized controlled trial. Journal of Manipulative and Physiological Therapeutics, 34(10), 507-513.
Hanten, W. P., Olson, S. L., Butts, N. L., & Nowicki, A. L. (2000). Effectiveness of a home program of ischemic pressure followed by sustained stretch for treatment of myofascial trigger points. Physical Therapy, 80(10), 997-1003.
Beardsley, C., & Škarabot, J. (2015). Effects of self-myofascial release: A systematic review. Journal of Bodywork and Movement Therapies, 19(4), 747-758.
Barnhart, A., Davenport, T. E., & Chinn, L. A. (2017). The effects of myofascial release on the autonomic nervous system response. Journal of Bodywork and Movement Therapies, 21(1), 5-11.
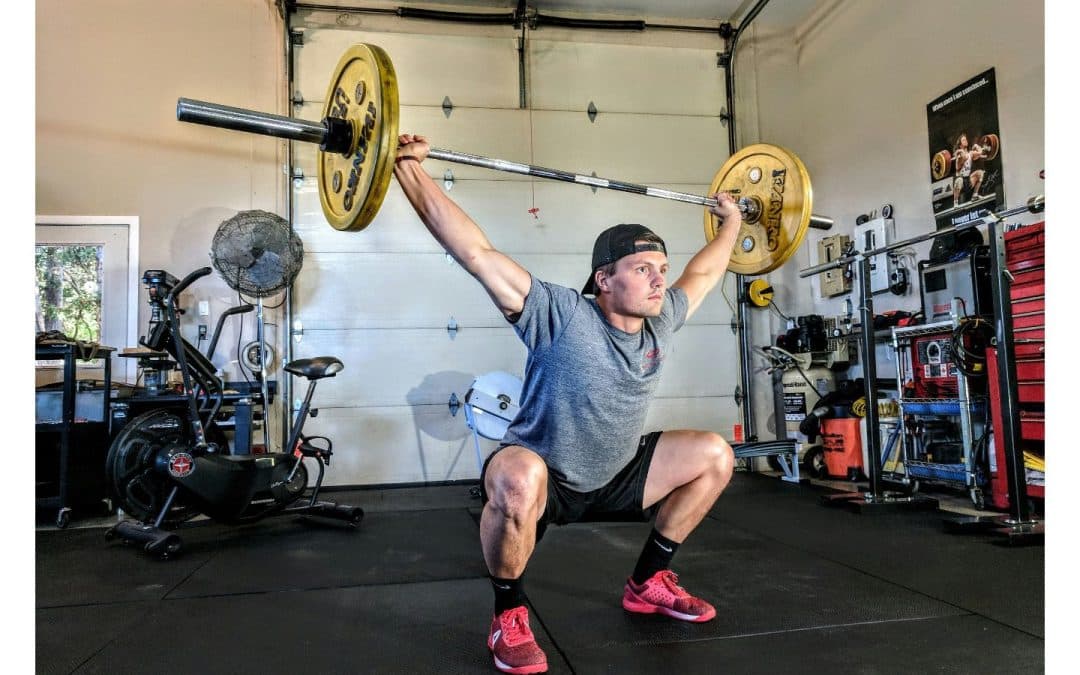
A Review of This Popular CrossFit and Olympic Weightlifting Exercise
The snatch is a dynamic and powerful Olympic weightlifting movement that involves lifting a barbell from the ground to overhead in one fluid motion. This complex exercise not only demands strength but also requires coordination, balance, and technique. Let’s delve into the primary muscles worked during the snatch and how to perform it safely to maximize benefits and minimize risks.
Muscles Worked During the Snatch
The snatch is a full-body movement that engages multiple muscle groups. Here’s a breakdown of the primary muscles involved:
1. Leg Muscles
Quadriceps: These muscles are heavily engaged during the initial lift-off from the ground and the catch phase.
Hamstrings: They assist in the explosive movement and stabilization throughout the lift.
Gluteus Maximus: Provides power for the explosive extension of the hips.
2. Core Muscles
Abdominals: Engage to stabilize the torso during the lift.
Obliques: Assist in maintaining balance and proper form.
Erector Spinae: These muscles in the lower back are crucial for maintaining an upright posture during the lift.
3. Upper Body Muscles
Deltoids: The shoulder muscles are heavily engaged during the overhead press portion.
Trapezius: This muscle helps in shrugging the shoulders to get under the bar.
Latissimus Dorsi: Assist in the pulling phase and stabilize the bar overhead.
Rhomboids and Rotator Cuff Muscles: Stabilize the shoulder and maintain proper scapular positioning.
4. Arm Muscles
Biceps and Triceps: These muscles stabilize the arms during the catch and hold the bar overhead.
Forearm Muscles: Engage to grip the bar securely.
Steps to Perform the Snatch Safely
To execute the snatch safely and effectively, follow these steps:
1. Setup
Stand with feet shoulder-width apart, toes slightly pointed out.
Position the barbell over the middle of your feet.
Grip the bar with a snatch grip, which is usually slightly wider than shoulder-width.
2. Starting Position
Lower your hips and bend your knees while keeping your chest up and back flat.
Ensure your shoulders are slightly in front of the bar.
Look straight ahead or slightly upward to maintain a neutral spine.
3. First Pull
Push through your whole foot, lifting the barbell from the ground.
Keep the bar close to your body and maintain a flat back.
4. Transition (Second Pull)
As the bar passes your knees, explosively extend your lower body—hips, knees, and ankles (known as the triple extension).
Shrug your shoulders and pull the bar upward with your arms.
Keep the bar close to your body and reach full extension with your hips, knees, and ankles.
5. Third Pull and Catch
As the bar reaches its highest point, pull yourself under the bar.
Rotate your wrists and elbows to catch the bar overhead.
Land in a deep squat position with the bar directly overhead.
6. Recovery
Stand up from the squat position while keeping the bar overhead.
Ensure your body is fully extended and balanced before lowering the bar.
Snatch Variations
1. Hang Snatch
Start from the hang position, where the barbell is lifted to the hips before performing the snatch.
Focuses on the second and third pull, helping to improve explosiveness and technique.
2. Muscle Snatch
Lift the barbell from the ground to overhead without dropping into a squat.
Emphasizes upper body strength and pulling power.
3. Dumbbell Snatch
Perform the snatch with a dumbbell instead of a barbell.
Great for unilateral training and improving shoulder stability.
4. Kettlebell Snatch
Similar to the dumbbell snatch but performed with a kettlebell.
Engages the core and stabilizing muscles more due to the kettlebell’s unique weight distribution.
5. Snatch Balance
Start with the barbell on your shoulders and perform an overhead squat by dropping under the bar.
Enhances your ability to stabilize and catch the bar overhead.
Tips for Safe Execution
Warm-Up Properly: Ensure your muscles are adequately warmed up with dynamic stretches and light cardio.
Start with Light Weights: Focus on mastering the technique before increasing the weight.
Use Proper Equipment: Ensure you have appropriate footwear and use a barbell that rotates smoothly.
Seek Professional Guidance: Consider working with a certified coach or Physical Therapist like the team at South Island Physiotherapy to learn the correct form and technique.
Listen to Your Body: Avoid pushing through pain. If something doesn’t feel right, stop and assess your form or consult a professional.
Practice Mobility: Incorporate mobility exercises into your routine to improve flexibility and prevent injuries.
Common Snatch Mistakes
Pulling with the Arms: Focus on using your legs and hips to generate power rather than relying on your arms.
Poor Shoulder Mobility: Work on shoulder mobility exercises to ensure you can hold the bar overhead safely.
Not Keeping the Bar Close to the Body: Keep the bar close during the lift to maintain control and efficiency.
Incorrect Starting Position: Ensure your hips are low, chest is up, and shoulders are in front of the bar at the start.
Inadequate Triple Extension: Fully extend your hips, knees, and ankles during the second pull to maximize power output.
Incorporating the Snatch into Your Workouts
Strength and Conditioning Programs: The snatch is a great addition to strength and conditioning routines, promoting full-body strength and explosiveness.
CrossFit Workouts: The snatch is a staple in CrossFit training, enhancing functional fitness and performance.
Sets and Reps: Start with lighter weights and higher reps (3-5 sets of 3-5 reps) to focus on technique. Gradually increase the weight as you become more comfortable.
Demo Videos: Watching exercise demonstrations from reputable sources like the National Strength and Conditioning Association can help refine your technique. But nothing really substitutes a personalized approach of a trained physical therapist like the ones we have a South Island Physiotherapy.
Conclusion
The snatch is a highly effective exercise for developing explosive power and engaging multiple muscle groups. By understanding the muscles involved and adhering to proper technique and safety guidelines, you can maximize the benefits of this dynamic lift while minimizing the risk of injury. Remember, practice and patience are key to mastering the snatch and achieving your fitness goals. Whether you’re using a barbell, dumbbell, or kettlebell, the snatch can be a valuable addition to your workout regimen, enhancing your strength, coordination, and overall athletic performance.
Chiropractic care has grown in popularity as an effective treatment for various musculoskeletal conditions, particularly those affecting the spine. Chiropractors specialize in diagnosing and treating mechanical disorders of the musculoskeletal system, especially the lower back. This blog post provides an evidence-based guide on when it is indicated to see a chiropractor, focusing on 10 signs of low back pain.
What is Chiropractic Care?
Chiropractic care involves diagnosing, treating, and preventing disorders of the musculoskeletal system, particularly those affecting the spine. Chiropractors use hands-on spinal manipulation and other alternative treatments to improve spinal alignment and overall health.
Common Techniques Used by Chiropractors
Spinal Manipulation: Also known as chiropractic adjustment, this technique involves applying controlled force to the spine to improve spinal motion and physical function.
Mobilization: Gentle movement of the joints to increase range of motion.
Soft Tissue Therapy: Techniques such as massage to relieve muscle tension and spasms.
Exercise and Rehabilitation: Prescribed exercises to strengthen muscles and improve posture.
Lifestyle and Nutritional Advice: Guidance on diet, exercise, and lifestyle changes to support overall health.
10 Signs of Low Back Pain to See a Chiropractor
1. Persistent or Chronic Back Pain
Chronic back pain is one of the most common reasons people seek a chiropractor. Research has shown that spinal manipulation can be an effective treatment for chronic lower back pain, providing pain relief and improving function.
2. Sudden Onset of Acute Back Pain
For acute back pain, which is sudden and severe, chiropractic care can offer a non-invasive treatment option. Studies suggest that spinal manipulation can help alleviate acute back pain and restore mobility more quickly compared to other treatments.
3. Neck Pain Accompanying Back Pain
Neck pain, including whiplash injuries, can often accompany lower back pain and can be effectively treated with chiropractic adjustments. Evidence indicates that chiropractic care may reduce pain and improve neck function in individuals with chronic neck pain.
4. Headaches Related to Spinal Issues
Certain types of headaches, such as tension headaches and migraines, may be related to spinal issues and can benefit from chiropractic care. Spinal manipulation and other chiropractic techniques can help relieve pain and reduce the frequency and intensity of headaches.
5. Sciatica and Radiating Pain
Sciatica, characterized by pain radiating along the sciatic nerve from the lower back down to the legs, can be alleviated with chiropractic adjustments. Research suggests that spinal manipulation may help reduce sciatica symptoms and improve patient outcomes.
6. Stiffness and Limited Range of Motion
If you experience stiffness and limited range of motion in your lower back, chiropractic care can help. Spinal manipulation and mobilization techniques can improve flexibility and restore normal movement.
7. Poor Posture and Related Back Pain
Poor posture, often resulting from prolonged sitting or improper ergonomics, can lead to musculoskeletal problems and lower back pain. Chiropractic care can help correct posture issues, relieve pain, and improve overall spinal health.
8. Sports Injuries Affecting the Lower Back
Chiropractors often treat sports-related injuries, including those affecting the lower back. Chiropractic care can help athletes recover faster, improve their performance, and prevent future injuries.
9. Pinched Nerve and Numbness
A pinched nerve in the lower back can cause numbness, tingling, and pain in the affected area. Chiropractic adjustments can help relieve pressure on nerves, reduce symptoms, and improve function.
10. Recurring Pain Despite Other Treatments
Recurrent pain, especially in the lower back, that keeps coming back despite other treatments, is a strong indication to visit a chiropractor. Chiropractors can address the underlying causes of recurring pain and provide long-term relief.
When to Consult a Chiropractor: Evidence-Based Guidelines
1. Non-Responsive to Conventional Treatments
If traditional treatments such as medication, physical therapy, or rest have not provided relief for your musculoskeletal issues, chiropractic care may offer an alternative solution.
2. Preference for Non-Invasive Treatment
Chiropractic care is a non-invasive treatment option that does not rely on medication or surgery. If you prefer a natural approach to managing pain and improving function, consulting a chiropractor may be beneficial.
3. Chronic Conditions
For chronic conditions such as osteoarthritis or fibromyalgia, chiropractic care can be part of a comprehensive treatment plan. While it may not cure these conditions, it can help manage symptoms and improve quality of life.
4. Post-Injury Rehabilitation
After an injury, chiropractic care can aid in rehabilitation by restoring mobility, reducing pain, and promoting healing. This is especially relevant for sports injuries or after surgical procedures involving the musculoskeletal system.
Conclusion
Chiropractic care can be a valuable treatment option for a variety of musculoskeletal conditions, especially those affecting the lower back. If you are experiencing persistent or recurrent back pain, neck pain, headaches, sciatica, stiffness, poor posture, sports injuries, or pinched nerves, seeking help from a chiropractor may be beneficial. Chiropractic care offers a non-invasive, drug-free approach to managing pain and improving overall function. Always consult with a healthcare provider to ensure chiropractic care is appropriate for your specific condition and to develop a comprehensive treatment plan tailored to your needs.
Health Consequences, Benefits of Exercise, and When to Seek Medical Attention
Blood pressure is a critical health indicator often referred to as the silent killer due to its subtle yet potentially devastating effects. This blog post educates on high blood pressure, the health consequences of hypertension, the positive effects of exercise on blood pressure, and when to seek medical attention.
What is Blood Pressure?
Blood pressure is the force exerted by circulating blood against the walls of the arteries. It is measured using a blood pressure monitor and recorded as two numbers:
Systolic pressure: The top number represents the pressure in your arteries when your heart beats.
Diastolic pressure: The bottom number indicates the pressure in your arteries when your heart rests between beats.
A normal blood pressure reading is typically around 120/80 mmHg, according to the American Heart Association. Blood pressure can fluctuate based on activity, stress, diet, and overall health.
Health Consequences of High Blood Pressure
High blood pressure, or hypertension, occurs when the force of the blood against the artery walls is consistently too high. This condition can lead to severe health problems, including:
1. Heart Disease and Stroke
Hypertension increases the risk of heart disease, including heart attacks and strokes. The increased pressure can damage the arteries, making them less elastic, which decreases the flow of blood and oxygen to the heart and brain.
2. Aneurysm
Persistent high blood pressure can cause blood vessels to weaken and bulge, forming an aneurysm. If an aneurysm ruptures, it can be life-threatening.
3. Heart Failure
The heart has to work harder to pump blood against the higher pressure in the vessels, leading to thickening of the heart muscle. Over time, this can cause the heart to struggle to pump enough blood to meet the body’s needs, leading to heart failure.
4. Kidney Damage
Hypertension can damage the blood vessels in the kidneys, affecting their ability to filter waste from the blood effectively. This can lead to kidney disease or failure.
5. Vision Loss
High blood pressure can damage the tiny, delicate blood vessels that supply blood to the eyes, leading to vision problems or blindness.
6. Metabolic Syndrome
This syndrome involves a combination of disorders, including high blood pressure, high blood sugar, excess body fat around the waist, and abnormal cholesterol levels. It increases the risk of heart disease, stroke, and diabetes.
Positive Effects of Exercise on Blood Pressure
Regular physical activity is one of the most effective ways to prevent or manage hypertension. Here’s how exercise can positively impact blood pressure:
1. Lowers Blood Pressure
Exercise helps lower blood pressure by improving the heart’s efficiency, allowing it to pump blood with less effort, reducing the force on the arteries.
2. Promotes Weight Loss
Maintaining a healthy weight is crucial for blood pressure control. Exercise helps burn calories and reduces body fat, which can help lower blood pressure.
3. Improves Heart Health
Regular physical activity strengthens the heart muscle, improving its ability to pump blood and reducing the workload on the arteries.
4. Reduces Stress
Exercise can lower stress levels, which can contribute to high blood pressure. Activities like walking, swimming, and yoga can help promote relaxation and reduce stress hormones.
5. Improves Sleep
Regular physical activity can improve sleep quality, which is important for maintaining healthy blood pressure levels.
Recommended Exercises for Blood Pressure Management
Aerobic exercises: Walking, jogging, cycling, swimming, and dancing.
Strength training: Lifting weights or using resistance bands.
Flexibility and balance exercises: Yoga and tai chi.
Exercise Guidelines
Aim for at least 150 minutes of moderate-intensity aerobic activity or 75 minutes of vigorous-intensity activity each week.
Include muscle-strengthening activities on two or more days a week.
Start slowly and gradually increase the intensity and duration of your workouts.
Measuring Blood Pressure at Home
Monitoring blood pressure at home is a practical way to keep track of your health. Using a home blood pressure monitor allows you to regularly measure your blood pressure and understand how lifestyle changes impact your health.
Steps to Measure Your Blood Pressure at Home:
Choose a Home Blood Pressure Monitor: Select a reliable device, preferably one validated by the American Heart Association.
Prepare for Measurement: Sit quietly for five minutes before measuring. Avoid caffeine, exercise, and smoking 30 minutes prior.
Position Correctly: Sit with your back straight and supported, feet flat on the floor, and arm supported at heart level.
Take Multiple Readings: Take two or three readings one minute apart and record the results.
When to Seek Medical Attention
It’s important to regularly measure your blood pressure and seek medical attention if you experience any of the following:
1. Consistently High Readings
If your blood pressure readings are consistently above 140/90 mmHg, it’s time to consult a healthcare provider.
2. Symptoms of Severe Hypertension
Symptoms such as severe headaches, shortness of breath, nosebleeds, chest pain, visual changes, or blood in the urine require immediate medical attention.
3. Medication Side Effects
If you’re experiencing side effects from blood pressure medication, consult your doctor to adjust the dosage or explore alternative treatments.
4. Uncontrolled Blood Pressure
Despite lifestyle changes and medication, if your blood pressure remains high, further medical evaluation and intervention may be necessary.
5. Other Health Conditions
If you have conditions like diabetes, kidney disease, or heart disease, regular blood pressure monitoring and management are crucial.
Conclusion
Understanding and managing blood pressure is vital for maintaining overall health and preventing serious health issues. Regular exercise, a healthy diet, stress management, and regular blood pressure checks are key components of blood pressure management. If you experience any concerning symptoms or have consistently high readings, seek medical attention promptly to ensure proper care and intervention. Your heart and arteries will thank you for it!
Diagnostic Technologies and Their Clinical Indications in Musculoskeletal Care
Medical imaging has transformed modern healthcare, providing critical insights that enable accurate diagnosis and effective treatment of many pathologies, including musculoskeletal injuries. Each imaging modality employs unique technologies and serves specific clinical purposes.
This guide delves into the primary types of medical imaging used to assist care of acute and chronic injuries, their underlying technologies, and their common clinical indications, highlighting the role of imaging in enhancing diagnostic accuracy and patient care.
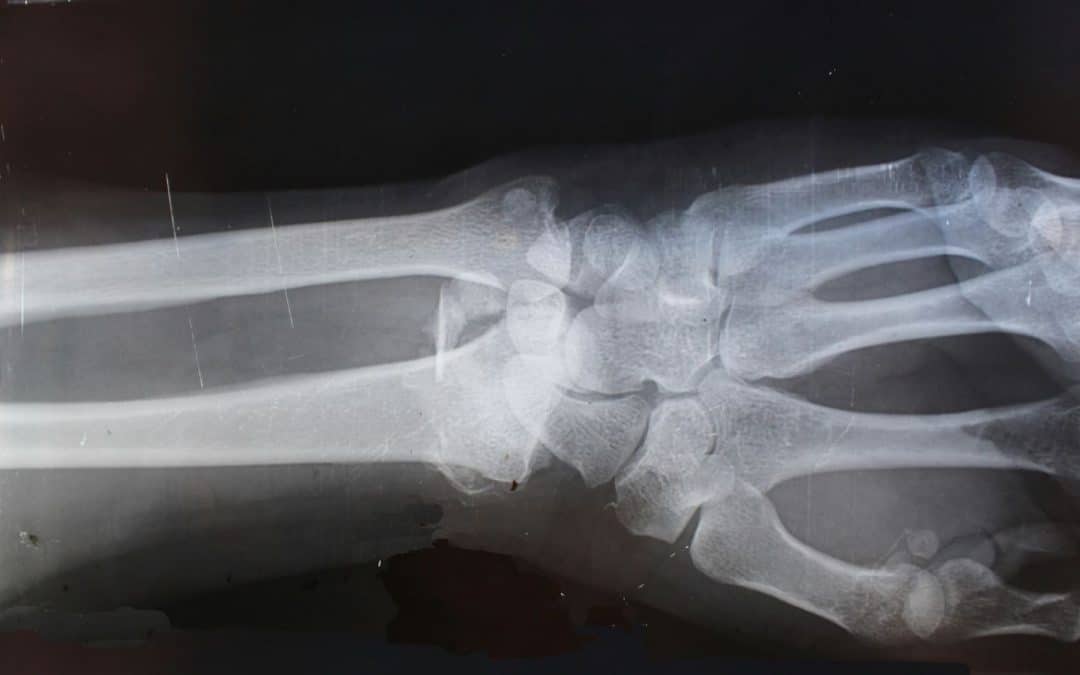
1. X-ray Imaging
Technology:
X-ray imaging is one of the oldest and most widely used imaging techniques. It uses ionizing radiation to produce images of the body’s internal structures. An X-ray machine emits X-ray beams that pass through the body and are captured by a detector on the other side. The varying absorption rates of different tissues create a contrast image, with bones appearing white, soft tissues in shades of gray, and air spaces black.
Clinical Indications:
X-rays are extensively used in diagnosing and managing a wide array of musculoskeletal conditions. Here are some of their primary applications:
Fracture Detection and Management:
Acute Fractures: X-rays are the first-line imaging modality for detecting acute fractures. They can identify the location, type, and extent of bone breaks, guiding initial treatment and management.
Stress Fractures: While early-stage stress fractures might not be visible on initial X-rays, they can show up on follow-up X-rays as callus formation or periosteal reaction.
Pediatric Fractures: X-rays are crucial for evaluating fractures in children, including growth plate (physeal) injuries, which require careful management to avoid growth disturbances.
Joint Pathologies:
Arthritis: X-rays are instrumental in diagnosing various types of arthritis. They can show joint space narrowing, osteophyte formation, subchondral sclerosis, and other characteristic changes associated with osteoarthritis, rheumatoid arthritis, and other arthritic conditions.
Joint Dislocations: X-rays provide clear images of joint dislocations, helping in the assessment of the extent of displacement and guiding reduction procedures.
Bone Pathologies:
Bone Tumors: X-rays can identify primary bone tumors and metastatic lesions. They help in characterizing bone lesions based on their appearance, such as lytic or sclerotic patterns.
Osteomyelitis: X-rays can detect signs of bone infection, including periosteal elevation, bone destruction, and new bone formation.
Spinal Disorders:
Degenerative Changes: X-rays of the spine are used to assess degenerative changes, such as disc space narrowing, osteophytes, and facet joint arthritis.
Scoliosis: X-rays provide a clear assessment of spinal curvature in scoliosis, helping in monitoring the progression and planning treatment.
Soft Tissue Assessment:
Calcifications: X-rays can detect soft tissue calcifications, such as myositis ossificans or calcific tendinitis.
Foreign Bodies: X-rays are useful for locating radiopaque foreign bodies in soft tissues, aiding in their removal.
Preoperative Planning and Postoperative Evaluation:
Preoperative Planning: X-rays provide essential anatomical details needed for planning orthopedic surgeries, such as fracture fixation, joint replacement, and spinal fusion.
Postoperative Assessment: X-rays are used to evaluate the positioning and integration of surgical implants, healing of fractures, and detection of potential complications like non-union or hardware failure.
Advances:
Digital X-ray technology has significantly improved image quality and reduced radiation exposure compared to traditional film X-rays. Additionally, portable X-ray machines have made it possible to perform imaging procedures at the bedside, enhancing accessibility in emergency and critical care settings.
2. Computed Tomography (CT)
Technology:
Computed Tomography (CT) scanning combines X-ray equipment with advanced computer processing to create detailed cross-sectional images of the body. During a CT scan, the X-ray tube rotates around the patient, capturing multiple images from different angles. These images are then processed by a computer to produce cross-sectional slices, which can be further reconstructed into 3D images.
Clinical Indications:
CT scans are extensively used in diagnosing and managing a wide range of musculoskeletal conditions. Here are some of its primary applications:
Fracture Detection and Assessment:
Complex Fractures: CT is invaluable in evaluating complex fractures, particularly in areas with intricate anatomy, such as the pelvis, spine, and facial bones. It provides detailed information on fracture lines, displacement, and comminution.
Subtle Fractures: CT can detect fractures that may not be visible on conventional X-rays, such as stress fractures and small cortical breaks.
Bone and Joint Pathologies:
Arthritis: CT imaging is used to assess the extent of joint damage in osteoarthritis and other arthritic conditions, visualizing bone spurs, joint space narrowing, and subchondral cysts.
Bone Tumors: CT scans help in the characterization and staging of bone tumors, providing detailed information on the lesion’s size, location, and potential cortical involvement.
Osteomyelitis: CT is useful in detecting bone infections, revealing areas of bone destruction, periosteal reaction, and abscess formation.
Spinal Disorders:
Disc Herniations: CT myelography, which involves the injection of contrast material into the spinal canal, enhances the visualization of disc herniations and their effect on nerve roots and the spinal cord.
Degenerative Changes: CT is effective in assessing degenerative spinal conditions such as spondylosis, facet joint arthritis, and spinal stenosis, providing detailed images of bony changes and foraminal narrowing.
Trauma: In cases of spinal trauma, CT quickly identifies fractures, dislocations, and bone fragments, guiding immediate management and surgical intervention if necessary.
Preoperative Planning and Postoperative Evaluation:
Surgical Planning: CT provides precise anatomical details crucial for planning orthopedic surgeries, such as fracture fixation, joint replacement, and spinal fusion. 3D reconstructions are particularly valuable in visualizing complex deformities and planning corrective procedures.
Postoperative Assessment: CT scans are used to evaluate the position and integrity of surgical implants, detect postoperative complications, and monitor the healing process.
Assessment of Bone Density and Structure:
Osteoporosis: Quantitative CT (QCT) measures bone mineral density, aiding in the diagnosis and management of osteoporosis. QCT provides volumetric measurements of bone density, which are more accurate than conventional dual-energy X-ray absorptiometry (DEXA) scans in some cases.
Vascular Evaluation:
Vascular Imaging: CT angiography (CTA) evaluates blood vessels, identifying conditions such as aneurysms, vascular malformations, and arterial stenosis. In the context of musculoskeletal imaging, CTA can assess vascular injuries associated with fractures or dislocations.
Advances:
Modern CT scanners offer high-speed imaging and lower doses of radiation through techniques like helical (spiral) CT and dual-energy CT. These advancements improve diagnostic accuracy and patient safety by minimizing radiation exposure.
3. Magnetic Resonance Imaging (MRI)
Technology:
Magnetic Resonance Imaging (MRI) uses powerful magnets, radio waves, and a computer to produce detailed images of the body’s organs and tissues. In an MRI scan, the magnetic field temporarily aligns hydrogen atoms in the body. Radiofrequency pulses then disrupt this alignment, and the returning signals are used to generate images. MRI provides excellent soft tissue contrast without using ionizing radiation.
Clinical Indications:
Joint Pathologies:
Cartilage Lesions: MRI is the gold standard for evaluating cartilage integrity and detecting chondral lesions and osteochondritis dissecans. High-resolution imaging allows for detailed assessment of cartilage thickness and surface irregularities.
Meniscal Tears: In the knee, MRI is particularly useful for diagnosing meniscal tears, providing detailed images of the menisci and surrounding structures.
Labral Tears: MRI arthrography, which involves injecting contrast material into the joint, enhances the visualization of the labrum in the shoulder and hip, aiding in the diagnosis of labral tears and impingement syndromes.
Tendon and Ligament Injuries:
Rotator Cuff Tears: MRI accurately detects partial and complete tears of the rotator cuff tendons in the shoulder. It also assesses the extent of tendon retraction and muscle atrophy, guiding surgical planning.
Anterior Cruciate Ligament (ACL) Tears: MRI is essential for diagnosing ACL injuries in the knee, visualizing the ligament’s integrity and associated injuries to other structures like the menisci and collateral ligaments.
Achilles Tendon Injuries: MRI evaluates the Achilles tendon for tears, tendinopathy, and associated conditions such as retrocalcaneal bursitis.
Bone and Marrow Pathologies:
Stress Fractures: MRI is more sensitive than X-ray in detecting early stress fractures and bone marrow edema, providing critical information for early intervention and management.
Bone Tumors and Infections: MRI is highly effective in characterizing bone tumors and infections (osteomyelitis), offering detailed images of bone marrow changes, tumor extent, and soft tissue involvement.
Muscle Injuries and Disorders:
Muscle Tears: MRI accurately identifies muscle strains and tears, grading the severity of the injury and helping guide rehabilitation strategies.
Myopathies: MRI can detect inflammatory and metabolic myopathies, visualizing muscle edema, fatty infiltration, and atrophy.
Nerve Disorders:
Peripheral Neuropathies: MRI can visualize peripheral nerves and diagnose compressive neuropathies, such as carpal tunnel syndrome and ulnar nerve entrapment. It helps identify the site and cause of nerve compression.
Brachial Plexus Injuries: MRI is crucial in evaluating traumatic and non-traumatic brachial plexus injuries, providing detailed images of nerve roots, trunks, and associated lesions.
Spine Disorders:
Disc Herniations: MRI is the preferred imaging modality for diagnosing intervertebral disc herniations, visualizing the extent of disc protrusion and its impact on adjacent neural structures.
Spinal Stenosis: MRI assesses spinal canal narrowing and nerve root compression, aiding in the diagnosis and management of spinal stenosis.
Vertebral Infections and Tumors: MRI provides detailed images of vertebral bodies and intervertebral discs, essential for diagnosing infections (spondylodiscitis) and tumors.
Neurological Disorders: MRI is the gold standard for diagnosing brain tumors, strokes, multiple sclerosis, and spinal cord injuries. It provides high-resolution images of brain and spinal cord structures.
Musculoskeletal Problems: MRI is ideal for evaluating joint abnormalities, soft tissue injuries, and spinal disc issues. It can detect ligament tears, cartilage damage, and other musculoskeletal conditions.
Cardiac Imaging: Cardiac MRI assesses heart structure and function, detecting conditions such as cardiomyopathy, congenital heart disease, and myocardial infarction ( heart attack).
Advances:
Functional MRI (fMRI) measures brain activity by detecting changes in blood flow, providing insights into brain function and aiding in pre-surgical planning. Additionally, advancements in MRI technology, such as higher field strengths (3T and 7T MRI), enhance image resolution and diagnostic capabilities.
4. Ultrasound
Technology:
Ultrasound imaging uses high-frequency sound waves to create real-time images of the inside of the body. A transducer emits sound waves and records the echoes as they bounce back from internal tissues. The captured echoes are used to construct images, which can be viewed in real-time, making ultrasound particularly useful for dynamic studies.
Clinical Indications:
Tendon and Ligament Injuries:
Tendon Tears and Tendinopathy: Ultrasound is highly effective in detecting partial and complete tendon tears, as well as tendinopathies (degenerative changes in tendons). Common sites include the rotator cuff in the shoulder, Achilles tendon, and patellar tendon.
Ligament Injuries: Ultrasound can identify ligament sprains and tears, particularly in the ankle, knee, and wrist. Dynamic imaging can assess the stability of ligaments during stress maneuvers.
Muscle Injuries:
Muscle Tears: Acute muscle injuries, such as strains and tears, can be readily identified. Ultrasound helps in grading the severity of muscle injuries, guiding appropriate treatment and rehabilitation.
Muscle Hernias: The real-time capabilities of ultrasound are beneficial in diagnosing muscle hernias, where a portion of the muscle protrudes through a defect in the fascia.
Joint Pathologies:
Joint Effusions: Ultrasound can detect fluid accumulation within joints, indicative of inflammation, infection, or injury. It also assists in guiding joint aspiration procedures to remove fluid for diagnostic and therapeutic purposes.
Arthritis: Inflammatory arthritis, such as rheumatoid arthritis, can be monitored using ultrasound to assess synovial thickening, joint effusions, and erosions.
Nerve Entrapments:
Carpal Tunnel Syndrome: Ultrasound is useful in diagnosing compressive neuropathies like carpal tunnel syndrome, where the median nerve is compressed at the wrist. It visualizes nerve swelling and structural changes.
Other Entrapments: Conditions such as ulnar nerve entrapment at the elbow and tarsal tunnel syndrome in the ankle can also be evaluated.
Bursitis and Cystic Lesions:
Bursitis: Ultrasound identifies inflammation of bursae, such as subacromial bursitis in the shoulder and trochanteric bursitis in the hip.
Cysts: Ganglion cysts, Baker’s cysts, and other fluid-filled lesions can be accurately detected and characterized.
Guided Interventions:
Injections and Aspirations: Ultrasound guidance improves the accuracy of therapeutic injections (e.g., corticosteroids) and aspirations (e.g., fluid removal) into joints, tendons, and soft tissue structures. This enhances the efficacy and safety of these procedures.
Biopsies: Ultrasound guidance is also used for performing needle biopsies of soft tissue masses to obtain tissue samples for pathological analysis
Advances:
Doppler ultrasound measures blood flow through vessels, aiding in the diagnosis of blockages, clots, and other vascular conditions. Advances in 3D and 4D ultrasound provide more detailed and dynamic images, improving diagnostic accuracy in various clinical scenarios.
The Role of Imaging in Enhancing Diagnostic Accuracy
Medical imaging is integral to modern diagnostics, offering a non-invasive means to visualize internal structures and functions. The different imaging modalities—X-ray, CT, MRI, ultrasound, and nuclear medicine—each have distinct strengths and clinical indications. Selecting the appropriate imaging technique based on the clinical scenario ensures optimal diagnostic accuracy and patient care.
Importance of Image Data and Medical Imaging Equipment
High-quality image data is crucial for accurate diagnosis and treatment planning. Advanced imaging equipment, including digital X-ray machines, high-resolution CT scanners, and high-field MRI systems, enhances the quality of images and diagnostic capabilities. Continuous advancements in imaging technology contribute to improved patient outcomes and more precise medical interventions.
Conclusion and a Word of Caution
Medical imaging has transformed healthcare by providing detailed insights into the human body, facilitating accurate diagnosis and effective treatment. Understanding the technologies and clinical indications for various imaging modalities enables healthcare professionals to choose the most appropriate methods for their patients. Continued advancements in imaging technology promise even greater precision, reduced radiation exposure, and improved patient outcomes.
With that said, diagnostic imaging does not show pain. In the world of conservative care, imaging rarely changes the course of treatment unless there is a concern for a more profound, high-risk injury ( like cancer or fracture) or evidence-informed conservative care has failed to assist in the resolution of the condition.
There is a host of evidence (that could be a blog post in and of itself) on how premature imaging of a biologically safe pain experience can lead to prolonged pain and even push someone into chronic disability, so these technologies need to be used practically and judiciously if we are being truly patient centred with our approach to injury. In short, an image does not trump the patient’s pain experience. It serves as a valuable tool to expand the diagnostic narrative when clinically indicated.
We at South Island Physiotherapy hope this review of common musculoskeletal medical imaging techniques provides insight into why certain types of imaging may be prescribed for your condition, and we are here to help you make sense of how they can assist you in your recovery.